Showing posts with label yeast. Show all posts

Saturday, December 27, 2014

Rustic No-knead Bread


There isn't much better than a warm, fluffy piece of bread. It is amazing. And being able to make your own bread so that you can eat it warm right out of the oven is even better. So, to add to the decadence, here is another bread recipe. I found it on Pinterest as Fast No-Knead Bread. It's a rustic, no-knead bread with a very simple recipe. You really CAN do this, so give it a try!

3 cups bread flour
1 packet (1/4 ounces) instant yeast
1 1/2 teaspoons salt
Oil, as needed


Combine yeast and about a teaspoon  of sugar in a large bowl with the 1 1/2 cups water. Whisk lightly until blended.


Add flour and stir until blended; dough will be shaggy.

 
Cover bowl with plastic wrap. Let dough rest about 4 hours at warm room temperature, about 70 degrees.


Lightly oil a work surface and place dough on it; fold it over on itself once or twice.


Cover loosely with plastic wrap and let rest 30 minutes more.
At least a half-hour before dough is ready, heat oven to 450 degrees. Put a 6-to-8-quart heavy covered pot (cast iron, enamel, Pyrex or ceramic) in oven as it heats. When dough is ready, carefully remove pot from oven. Slide your hand under dough and put it into pot, seam side up. Shake pan once or twice if dough is unevenly distributed; it will straighten out as it bakes.


Cover with lid and bake 30 minutes.


Remove lid and bake another 15 to 30 minutes, until loaf is beautifully browned. Cool on a rack.

Sunday, June 15, 2014

Easy Homemade Bread


Here's another installment in my homemade bread making quest. I've tried this recipe twice now, and it's quite tasty. I found the original, Simple One Hour Homemade Bread, on Pinterest. It is very straight forward and simple, and the texture of this bread is fantastic. It can be used for sandwiches or just as a side dish, or heck, just eat it warm with some butter like I did! This is a good one to try also if you're new to bread making.

5 1/4 cups white bread flour
3 Tbsp sugar
1 1/2 tsp salt
1 1/2 Tbsp yeast
1 1/2 Tbsp oil
2 cups warm water (somewhere between 100 and 115 degrees Fahrenheit)


Add the warm water, yeast, and sugar to your bowl and allow the yeast to activate, about 8 minutes or so.

 
Add oil, salt, and flour. 


Mix for 1 minute and then check the consistency of the dough. The dough should be very sticky. If it is too dry, add more water. Mix for 5 minutes. (Do not add any more flour after the dough has finished mixing.)


Spray kneading surface with cooking spray and turn dough out onto surface. Knead dough briefly until it has a smooth even consistency (this will only take several turns of the dough to accomplish).


Divide dough into 2 pieces (or more if you wish to have smaller loaves) and shape loaves into desired shapes and place on greased baking sheets. Cover with a large dish towel and let rise for 25 minutes.


While loaves are rising, preheat oven to 350 degrees Fahrenheit. When loaves are ready to go into the oven, use a sharp knife (you can lightly spray your knife with cooking spray to prevent dragging) to make several slashes in the top. Make each cut about 1/4-inch deep at a 30 degree angle.

 
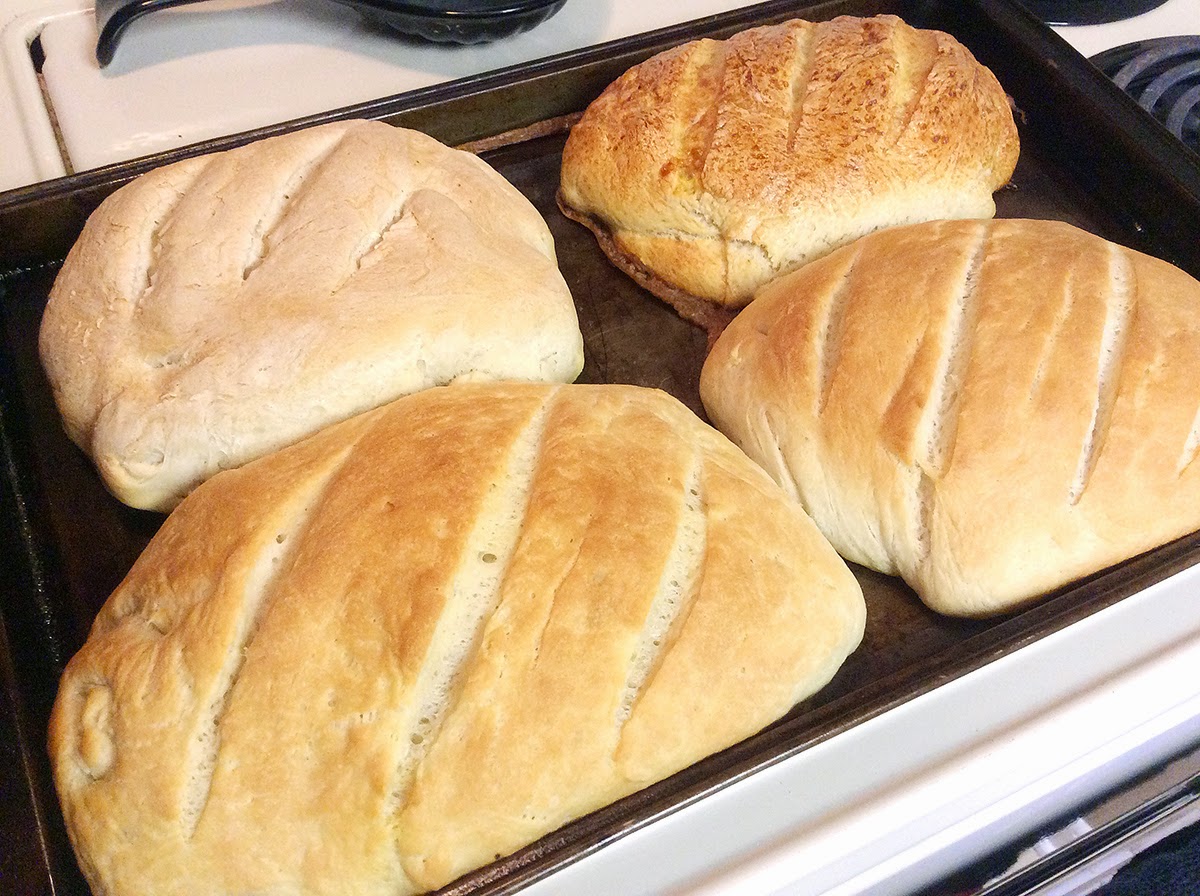
I decided to try an experiment the second time I made this bread. While the bread's texture was amazing, I wasn't terribly excited about the exterior of the bread. So, in my experiment, I divided the bread into four loaves, and topped each differently. Here's my results from top left, clockwise: plain as the recipe calls; egg wash, olive oil, butter. Clearly, the oil and butter created a much prettier topping than plain or an egg wash. Point is, try it how you like it, and choose what works for you.

Bake loaves for 25 minutes, or until they are golden brown.


Monday, January 20, 2014

Pull Apart Cinnamon Sugar Pumpkin Bread


If you like to experiment with new recipes, you know that not every one you attempt is going to be a winner. But the only way to find new things and find those "keeper" recipes, is to continue to try new ones. I found this recipe for Pull Apart Cinnamon Sugar Pumpkin Bread on Pinterest more than a year ago, and it took me several months before I actually tried it. The first bite floored me. This is an amazing treat. You can eat this for breakfast or a snack or a dessert. The pumpkin flavor is subtle, but this treat is rather sweet. This concoction is a yeast bread, so it is a little time consuming, but it's not difficult and very worth the time and energy. The original calls for rum in the glaze, which I decided not to use. Also, she says she erred in how she applied the cinnamon and sugar. The first time I made this, I did it the way she did, the second time, I did it the way it should have been, and I found the second way to work better. So check out mine, and check out hers and decide for yourself how you want to make it. Either way, you will not be disappointed. 

Bread ingredients
2 Tbsp unsalted butter
1/2 cup milk (room temperature)
2 1/4 tsp (1 envelope) active dry yeast
3/4 cup pumpkin puree
1/4 cup sugar
1 tsp salt
2 1/2 cups bread flour
1 cup granulated sugar
2 tsp ground cinnamon
1/2 tsp fresh ground nutmeg
2 Tbsp unsalted butter

Glaze ingredients
2 Tbsp unsalted butter
1/8 cup brown sugar
1 1/2 Tbsp milk
3/4 cup powdered sugar
1-2 tsp vanilla


In a saucepan over medium-high heat, brown 2 tablespoons of butter, letting it bubble up and turn a dark golden brown but being careful not to allow it burn (turn black). 


Once browned, remove the pan from the heat and carefully add the milk, return to stove and heat through. 


Pour the milk and butter into the bowl of standing mixer (fitted with a dough hook) and allow to cool so it is no longer hot but also not cool (about 100-110 degrees F). Once it has reached a warm but not hot temperature add the yeast and 1/4 cup of sugar and allow to proof (this can take up to 8 minutes, the top will look foamy and the liquid cloudy). 


Then add the the pumpkin, salt, and 1 cup of flour. 


Stir until combined then add the rest of the flour 1/2 cup at a time and knead for 6 minutes, until the dough is smooth and elastic and just slightly sticky. If the dough is too moist, add extra flour 1 tablespoon at a time. Move dough to a lightly oiled bowl and cover with a clean towel. 


Allow to rise in a warm place for 60-90 minutes or until doubled in size.


Combine sugar and cinnamon is a separate bowl. Melt 2 Tbsp of butter. When the dough has doubled in size, punch it down and flip out onto a clean floured surface and knead with hands for 1-2 minutes. Roll dough into a 20×12 inch rectangle. Brush dough with melted butter.


Evenly sprinkle the dough with the cinnamon-sugar mixture.


Cut the rectangle into 6 strips. Lay strips on top of each other and cut each strip into 6 even squares (cut in half then each half into thirds). Stack strips vertically into the loaf pan.


Cover the pan with a clean towel and let rise for 30-45 minutes. Preheat the oven to 350 degrees. Bake for 30-40 minutes until the top is a deep golden brown.


Before bread is finished baking prepare the glaze. Heat the butter, milk, and brown sugar in a small saucepan. Bring to boil then immediately remove the pan from the heat and stir in the vanilla and powdered sugar.


Pour over the bread as soon as you remove it from the oven.


Let the glaze settle and harden, and then try not to eat all the bread at once!


Wednesday, January 1, 2014

Yeast Rolls


If you're new to baking from scratch, let me assure you - this is the easiest bread you will ever make. Easy. Easy peasy. Did I mention, easy? Ok, enough of that. I made this during the holidays for Thanksgiving and Christmas, and they were a big hit! I found the recipe on Pinterest, but it didn't link to a recipe. The image was the recipe. It was titled "One Hour Yeast Rolls." You don't have to knead them. All you need is a bowl and a spoon!

1 cup warm water
1/4 cup sugar
1/3 cup oil
2 Tbsp yeast
1 tsp salt
1 egg, beaten
3 1/3 cup s flour


In a large bowl, mix together warm water, sugar, oil and yeast. Let stand for 15 minutes until yeast mixture is bubbly.


Stir in salt and beaten egg to yeast mixture. Gradually add flour until dough is manageable (although it will still be slightly sticky).


Cover with a towel, and let dough rest in the bowl for 10 minutes. 


Spray hands with non-stick cooking spray and form dough into balls. Place balls so they don't touch on cookie sheet. Cover and let rise for 20 minutes.


Bake at 375 degrees for 10 minutes. Melt 2-3 Tbsps of butter and brush the tops of the hot rolls.


Wednesday, May 8, 2013

French Baguettes


I think bread is one of the most amazing inventions ever. I could subsist off of bread alone. I guess that's why I've gotten so interested in making homemade bread lately. What I really, really, really want is a nice 6-quart stand mixer, but alas, I don't have one. I do however, have a hand mixer with a dough hook attachment, and I made excellent use of it in making these baguettes. I found the recipe on... can you guess? Yep, of course, I found it on Pinterest. Here's the original post: French Baguettes. The original has lots of great direction photos. However, the beauty of those baguettes make mine look downright dumpy. lol This is the second time I've tried the recipe, and while they don't look very pretty, they do indeed taste amazing.

3 1/2-4 cups all-purpose flour
1 1/2 cups warm water
1 pack active dry yeast
1 Tbsp sugar
2 tsp salt


Put the flour, yeast, and water in a bowl, and mix well. If using a hand or stand mixer, knead dough for seven minutes. Add salt, and then knead dough for another seven minutes. Note, dough should remain elastic and not stick to bowl. I ended up adding about another cup of flour (a little bit at a time until it looked right, which means it didn't look wet anymore).


Sprinkle with flour, cover and let rise for an hour to an hour and a half. Turn out dough on a lightly floured surface.


Divide dough into thirds. One portion at a time, roll out dough to a rectangle, then fold into thirds. 


Roll dough like a sausage, until desired size is achieved. Pinch ends. 


Put on a lightly floured baking pan or baguette pan. Cover with a damp towel, making sure maximum contact with the loaves. Let rise for 30 minutes. Put a pan of water in the oven and preheat oven to 460 degrees. Score the tops of the loaves and lightly sprinkle with flour. 


Reduce heat to 430 degrees, spritz some water into the oven, and put in bread and bake for 20-25 minutes (with my crazy oven, I had to preheat to 450, reduce to 400, and then only cooked them for 18 minutes, so it's very important to know your own oven and to time less as you can always cook it longer). Pull them out and enjoy!


Sunday, March 10, 2013

Crusty Rustic Bread


I think bread is heavenly. All kinds of bread. I love bread. Did I mention how much I love bread? So, because I love bread, I have begun trying to make my own. I've tried a number of recipes so far, and some have been great successes, and some... well, let's jus say, I'm learning. I found this recipe on Pinterest, and gave it a shot this weekend. Here is the link to the original post: Crusty Rustic Bread. This recipe was very, very, very easy. No kneading. No fuss. Just time, and lots of it. This bread needs to rise for 12-18 hours, so you need to mix it and set it to rise the night before you want to bake it. Here's the recipe:


3 cups all-purpose flour
1 3/4 tsp salt
1/2 tsp active dry yeast
1 1/2 cups warm water (about 110 degrees)

In a large mixing bowl, whisk together flour, salt and yeast. 


Pour in warm water and stir mixture with a wooden spoon until a shaggy ball forms. 


Cover bowl with plastic wrap and allow to rise for 12 - 18 hours (on the counter at room temperature).


Heat oven to 450 degrees. Once oven has reached 450 degrees, place a cast iron pot covered with lid into preheated oven, heat pot for 30 minutes. Note, I don't have a cast iron pot, and some recipes I've seen have called for a Dutch oven - which I don't have either. What I do have and have used with decent success so far is a Rachael Ray casseroval dish with lid that is safe up to 500 degrees.

Meanwhile, turn dough out onto a heavily floured surface then shape dough into a ball. Cover dough with plastic wrap and allow to rest while pot is heating. 


Remove pot from oven and with floured hands, carefully drop dough into hot pot (you DON'T need to grease the pot) cover with lid, then immediately return pot to oven and bake 30 minutes (at 450 degrees). 


After 30 minutes, remove lid from pot and bake uncovered for 15 minutes (my oven runs hot, so I turned the oven down to 400 degrees after about 10 minutes and cooked for about 20 minutes more, then turned down to 350 degree for another 10 minutes. Point is, check your bread and know your oven). Remove from oven and allow bread to cool on a cooling rack. Once completely cooled, bread stores well in an open paper bag (it helps the bread maintain it's crisp crust. I wouldn't recommend storing it in an airtight container or ziploc bag).


Recipe Source: adapted from Simply So Good, thank you for such an incredible post!