Thursday, July 24, 2014

Pork Tenderloin


I have a tendency to get complacent in my cooking and revert to tried-and-true originals, and while there's nothing wrong with tried-and-true recipes, sometimes we just have to shake things up. So, when I saw this recipe for a Pork Tenderloin with Pan Sauce on Pinterest, I pinneded it for someday. Someday finally came and it was so good, I decided to make it again so that I could blog it. There are so many flavors blended in this pork. It's so tender and juicy and just plain delicious.

1/2 cups olive oil
1/3 cup soy sauce
1/4 cup red wine vinegar
Juice of 1 lemon
1-2 Tbsp Worcestershire sauce

Few drops of liquid smoke
1-2 Tbsp fresh parsley, finely chopped
2 tsp dry mustard
Freshly cracked black pepper, to taste
4 cloves garlic, peeled and minced
1 1-lb. pork tenderloin with skin removed


Combine all marinade ingredients and reserve 2-3 Tbsp. I put mine in a sturdy plastic bag. Allow to marinate for 3-4 hours.
   

Preheat oven to 350 degrees. In a hot skillet over medium-high heat, sear each side of tenderloin for 2-3 minutes. Keep skillet as is; you will use this for the sauce.

Place in the oven and cook for 30-40 minutes or until the meat has reached 160 degrees. Let rest for at least 5 minutes before slicing. 

Pan Sauce:
Pan scrapings from pork tenderloin
1/2 cup of chicken broth
2-3 tbsp of pork marinade (thoroughly mixed)
1-2 tsp butter

Meanwhile, place the skillet back on the stove over medium heat. Add the chicken broth and scrape up all the browned pieces from the bottom of the pan.

Add the marinade and let it boil down for 2-3 minutes. Add the butter and remove from heat stirring until butter has melted. Pour over the pork tenderloin.


Cherry Pie


You're just not going to find too many recipes like this on my blog. What kind you wonder? Ones with cooked fruit. I just don't like cooked fruit. However, I had bought a bunch of cherries for my daughter and searched Pinterest for some recipe possibilities to make these for her. Cherry pie was one of the winners, and apparently it was pretty darn good, at least according to my mom and daughter! I found a number of pie filling recipes: Homemade Cherry Pie Filling, Super Simple Cherry Pie Filling, Homemade Cherry Pie Filling, Homemade Cherry Pie Filling, and Fresh Cherry Pie Recipe, and the following is what I ended up with.


4 cups cherries (pitted and rinsed)
1/3 cup water
1 1/3 Tbsp lemon juice
1/2 cup sugar
2 2/3 tsp cornstarch
1/4 tsp almond extract
1/2 tsp cinnamon
2 unbaked Pie Crusts


First thing you must do is remove the pits from the cherries. My daughter took on this task while I worked on some other recipes. Found a tip at one website about using a decorator tip to push the pits out. It worked pretty good for us. No matter how you do it though, it's going to be messy. If you intend to cook with fresh cherries a lot, there are pit removers that you can purchase.

In a saucepan combine cherries, water, sugar, cornstarch, cinnamon and lemon juice. 


Heat over medium heat until boiling. Reduce heat to low and simmer for 10 minutes.  Stir in almond extract. Pour into pie crust.


Top pie with second crust however you wish. I went with the basket weave for this one.


Bake at 425 degrees for 10 minutes. Reduce heat to 375 degree and bake for 45-50 minutes more until crust is golden brown. Cool on a wire rack.


Sunday, July 20, 2014

Lemon Pound Cake


I have fallen in love with lemon this year. I keep several lemons in my refrigerator at all times now. The smell of fresh lemon zest ranks among one of the best in the world to me. So when I saw this recipe for Lemon Pound Cake on Pinterest, I had to give it a try. I upped the ante on the recipe though by adding a sweet lemony glaze to the pound cake. It. is. so. good. I received so many compliments on this one at work (I took it in for one of my "Monday treats." My mom asked for one to take to a party and liked it so much that she has already asked me to make three for her for an event next month! The fresh lemon juice and the zest just add such a fresh citrus spark to this cake. You really should give it a try!

3 cups all purpose flour
1 Tbsp baking powder
3/4 tsp salt
3 cups sugar
1.5 cups unsalted butter, room temperature
5 large eggs
1/2 cup whole milk
6 Tbsp lemon juice
1 Tbsp lemon zest

Glaze
1-2 cups powdered sugar
1-3 Tbsps lemon juice
1/2 tsp almond extract
1-2 tsp lemon zest

Frosting
1.5 cups unsalted butter
1.5 lbs powdered sugar
1-2 Tbsp of lemon zest
3-6 Tbsp of lemon juice


Preheat oven to 350 degrees Fahrenheit. Spray or butter and flour two loaf pans or one large Bundt pan. Sift flour, baking powder and salt into medium bowl. Set aside.

Using an electric mixer, cream butter, shortening and sugar.


Add eggs one at a time, beating until well blended after each one.


Add dry ingredients in three additions to butter mixture alternately with milk, beginning and ending with flour mixture. Beat at low speed just until blended after each addition.


Mix in lemon juice and zest.


Pour batter into prepared pans.

 
Bake cakes until tester inserted into center comes out clean, about 55 minutes. Cool cakes in pans for 15 minutes. Turn cakes out onto racks and cool completely. Note, I've made this pound cake twice now, and both times, I've lost large chunks of my cake when I turned it out of the pan. Still working on that... BUT, add the glaze and you will not care!

To make the glaze, add the almond extract and enough lemon juice to your powdered sugar so that it is thick enough to drizzle, but not too runny. Add in lemon zest. Drizzle onto completely cooled cake.


Sunday, July 6, 2014

Tiramisu


There is not a much better dessert than a rich tiramisu. This is a classic Italian dessert found in almost every Italian restaurant. If you've never tried it, you should! It's made with a soft cookie, in this recipe it is Ladyfingers; dark chocolate; cocoa; and marscapone cheese, which is similar to cream cheese but smoother and sweeter. Tiramisu is lovely layers of rich chocolately yumminess. It's not a difficult recipe to follow; you just need to make sure to follow the steps correctly. I found this recipe on Pinterest at: Bailey's Hazelnut Chocolate Tiramisu

3 eggs, separated
6 tablespoons powdered sugar and 1 teaspoon powdered sugar, divided
1/2 cup espresso or strong coffee, divided
6 tablespoons and 4 tablespoons Bailey’s Hazelnut Liqueur, divided
1 pound Bel Gioso Tiramisu mascarpone cheese*
1 teaspoon vanilla extract
1 (7-ounce) package Ladyfingers
1/2 cup Ghirardelli 60% cacao chocolate chips, melted and cooled
cocoa powder for dusting
dark chocolate covered espresso beans for garnish, optional


First melt your chocolate in a microwave safe bowl for 30 seconds. Check it; stir, and then microwave for another 30 seconds. Check and stir, and then microwave in 15 second intervals until smooth. Do not overcook or the chocolate will burn. Set chocolate aside to cool. In a large bowl, beat 3 egg yolks, 6 tablespoons powdered sugar, 1 tablespoon espresso, 6 tablespoons Bailey’s Hazelnut Liqueur for a couple of minutes until well combined and thickened.

 
Add the mascarpone cheese and vanilla extract and beat until well combined and fluffy, about 5 minutes.


In a separate (very clean) bowl (use a stand mixer if you have one for this part), whisk 3 egg whites until foamy. Add 1 teaspoon powdered sugar and whip to stiff peaks.

 
Stir about 1/3 of the egg white mixture into the egg yolk mixture to lighten it; then fold the rest of it in gently. Taste for flavor.


Pour the rest of the espresso and Bailey’s into a flat dish. Dip one side of each Ladyfinger in this mixture for just 5 seconds (so it doesn’t get soggy) before layering them, soaked side up, in a deep serving dish.

 
Repeat, lining the entire bottom of the dish with the cookies. Drizzle cooled melted chocolate all over the cookies. Dollop about 1/3 to 1/2 (depending on how many layers you think you’ll be able to get in your dish) of the mascarpone mixture (called zabaglione) over the top and use an offset spatula to spread it into an even layer.

 
Dust this with cocoa powder. Repeat layering dipped cookies, melted chocolate, zabaglione, and a dusting of cocoa powder, ending with a layer of the zabaglione dusted with cocoa powder.


This is the second time I made this recipe. The first time I used a very deep oval casserole dish and ended up with about three layers of ingredients. This time I used a 10X14 rectangular dish and got two layers, but there's not quite enough zagablione in each piece for my taste. Next time, I'm going to use a 9X13, and I think it might just be perfect.


Chill at least one hour before serving. Dot with dark chocolate covered espresso beans and serve. Eat within 36 hours or so, or things start to get soupy.

Wednesday, July 2, 2014

Nachos


If you've looked through much of my blog, then you've already figured out that I love Mexican food. Here's another installment of my Mexican-ish dishes.

These nachos have a long history at my house. My dad started making these when I was rather young - I know before I was 10. I know this because that's about how long I've been making them for myself and my friends. Nearly every one of my friends who stayed the night with me at some point tried these nachos. I took what my dad started with and turned it into an art form. 

A funny story about these tasty treats... several months after moving to the South when I was 15, I went out one night with some of my new friends. When I returned, my mom said to me, "You'll never guess who called almost right after you left." I said, "BECKY!!!! Can I call her back???" Becky was my best friend from New York, and I missed her terribly. As calm as could be, my mom said, "No need. She was calling for the recipe for nachos. We told her what she needed to make them and how." I was crestfallen. lol The other day on Facebook, Becky posted that she was going to treat herself to some of these nachos, and I responded that it was probably high time I did a blog on these bad boys. She agreed completely!

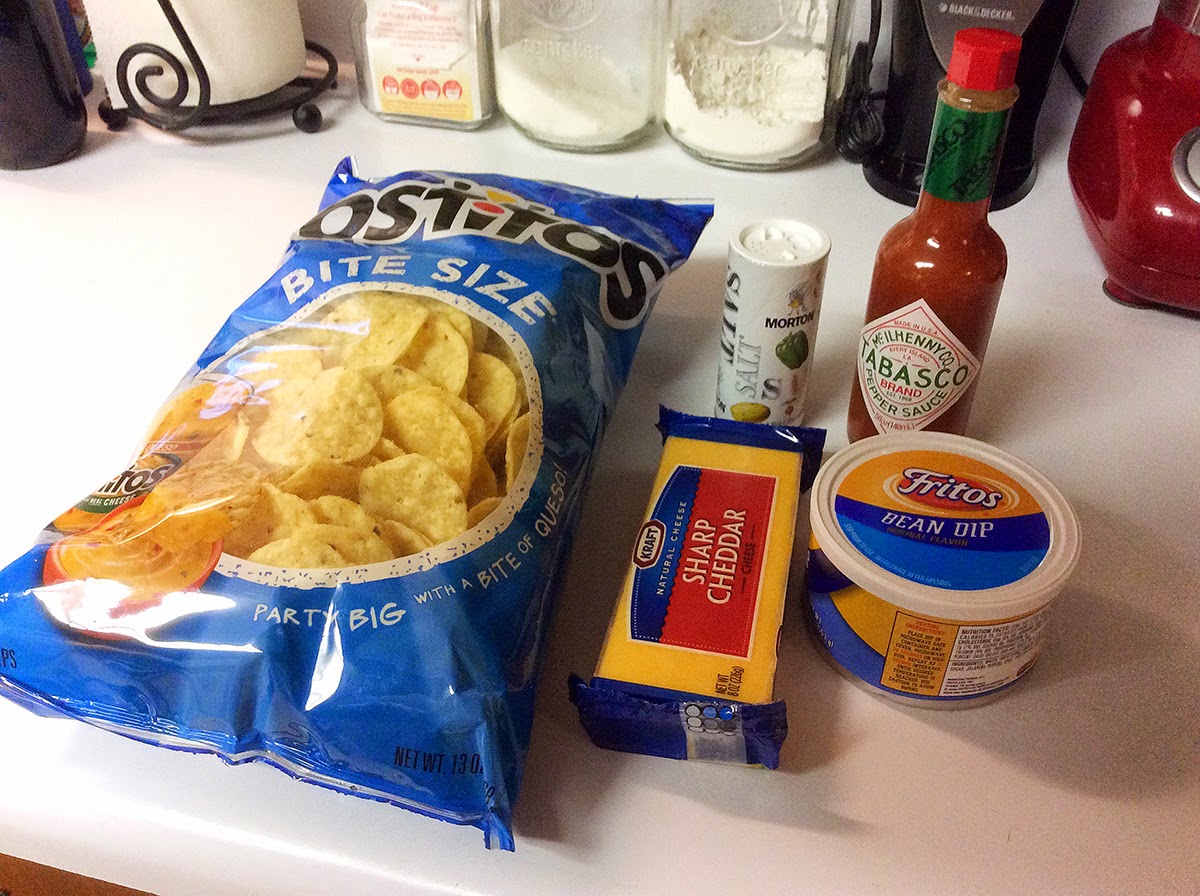
They are not hard, but you need to use the right ratios between the ingredients to get the right taste. If you use too much bean dip, the chips will get soggy; too little and they are dry. Use too much cheese and it will overwhelm the other ingredients; not enough... well, you get the picture. Here is all you need for these amazing treats:

Bite Size Tostitos
1 can Fritos bean dip
Block of cheddar cheese (I prefer sharp or even extra sharp, but any will work; I also almost exclusively use Kraft)
Tabasco sauce
salt


These really are easy; it just takes a little time to get it right, but it is so worth it. 

First, line your baking tray with aluminum foil. Many many years ago I tired of scraping and scrubbing melted cheese off the tray and learned my lesson. Please don't learn this the hard way. 

Then start prepping the nachos. Take a chip and apply a thin coat of bean dip - I probably use about 1 tsp or so (and no, I've never in my life measured it) per chip. Then cut a thin slice of cheddar for each chip - I'd guess that my cheese is about 1-2 mm thick. Then apply a dot of Tabasco. I've gotten heavy handed with the Tabasco as I've aged - on purpose. Although I usually try and create some light ones also in case they start to get too hot for me. Here's a photo that shows the different steps:


I only did this tray for you. I always do the entire thing in stages: chips and bean dip; cheddar; tabasco. Place in 350-400 degree oven and bake until cheese is partially melted. It will continue to melt a little once removed from the oven. If you wait until the cheese is melted and all blending together, then your nachos will be much harder to separate and will be missing much of the cheese you intended for each one.

 I lightly sprinkle salt over the tray, and then serve immediately. Did I mention that these nachos are amazing? The Tabasco can begin to burn your tongue after several of these, so one way I avoid this is by bending the chips in half before eating. Another trick I do sometimes is to make a nacho sandwich - use a heavy Tabasco/heavy cheese with a light Tabasco/light cheese and stack them chip side out to each other. I know, you're not supposed to play with your food, but these are just too fun not to! lol