Showing posts with label olive oil. Show all posts

Tuesday, June 12, 2018

Pesto Chicken with Tomatoes and Asparagus


I was looking for healthier, high protein recipes and came across this gem on Pinterest: One Pan Pesto Chicken and Veggies. I added the garlic to the original recipe, and I also recommend using the sundries tomato oil to cook the chicken for added flavor. In checking the recipe ingredients, 6 oz of chicken and veggies has 329 calories, 31.6 g protein, 17.1 g fat, and 15 g carbs. If you are sparing with the pesto, you should be able to lower the fat and carbs. No matter what, everyone who has tried this dish has loved it. It also reheats pretty well when I take it to work for lunch, which I count as a win! There is so much flavor in the dinner, and it is pretty easy to make, two more wins in my book. You're going to want to try this recipe.

2 Tbsp olive oil
1-1.25 pound chicken thigh or breast meat, boneless and skinless, sliced into strips
1/3 cup sun-dried tomatoes drained of oil, chopped
1 pound asparagus ends trimmed, cut in half, if large
1/4 cup basil pesto
1 cup cherry tomatoes yellow and red, halved

4-6 cloves of garlic, minced (or use jarred minced garlic)
Salt and pepper to taste

Slice tomatoes in half; cut ends off of asparagus; and chop sun dried tomatoes.


Slice chicken into large pieces.


Salt and pepper generously to taste.


Heat large skillet on medium-high heat, add 2 tablespoons olive oil (you can use some of the oil from the sun-dried tomatoes for additional flavor). Add chicken and add half of chopped sun-dried tomatoes.


Cook everything 5-10 minutes, flipping chicken a couple of times, until the chicken is completely cooked through.


Remove the chicken and sun-dried from the skillet, leaving oil in.


Add asparagus, seasoned generously with salt and remaining half of sun-dried tomatoes.  


Reduce heat to medium and cook about 5 minutes. Add the garlic and cook several more minutes until the asparagus is cooked through. I cook just until the asparagus is fork tender.


Remove asparagus to serving plate. Add chicken back to the skillet, add pesto, stir to coat on low-medium heat until chicken is reheated, 1 or 2 minutes, and pesto is dispersed. 


Add tomatoes and cook for a couple of minutes; remove skillet from heat.


Serve chicken, tomatoes, and asparagus, and watch your family gobble it up!


Sunday, March 27, 2016

Lemon Herb Chicken


Chicken is one of the most versatile proteins to add to a meal. It can be prepared in so many delicious ways that it's hard sometimes to decide where to start. I was searching Pinterest a few weeks ago for some new chicken recipes when I stumbled onto: Grilled Chicken Breasts with Lemon and Herbs. I made it for the first time the very day that I found it... and it was goooooooood! Very juicy and tender and light. Pairs great with my Sautéed Spinach and Herb Roasted Potatoes. This will be a great addition to your recipe collection. It's simple and easy and so very tasty... so check it out!

2-4 Foster Farms Boneless, Skinless Chicken Breasts (about 1 1/2 pounds total)
3 garlic cloves, minced
1/2 tsp salt
1/4 tsp black pepper
2 Tbsps finely chopped fresh parsley
1/2 tsp finely chopped fresh thyme
1/2 tsp finely chopped fresh oregano
1/4 tsp finely chopped fresh rosemary
3 Tbsps lemon juice
1/3 cup extra virgin olive oil


Prepare the chicken by cutting off excess fat or gristle and rinsing. Pound each piece with the flat side of a mallet between a folded piece of plastic wrap to avoid splattering.


Prepare spices, salt, pepper and garlic.


Put chicken in a freezer bag of appropriate size for how many chicken breasts you have. Pour the spices mixture over the chicken. Squeeze in the lemon juice and then add the oil. Massage the marinade onto the chicken to ensure it is evenly coated. Put in the refrigerator to rest.


The marinade should stay on as long as possible. I've done as little as 2 hours and as much as 3-4 days (with slightly frozen chicken to start with). At least overnight would be ideal. The longer you can let it set, the better it will be. Pull the chicken out of the refrigerator about 30 minutes before ready to cook. Heat the skillet. You can add a spoonful of marinade to know when the skillet is hot enough. Add chicken to the skillet and cook on both sides until browned and cooked through.


Pair this chicken with your favorite sides and enjoy!


Saturday, January 16, 2016

Herb Roasted Potatoes


Potatoes are another item that is very versatile and a common staple in my kitchen. This recipe, specifically, I found on Pinterest at Lemon Herb Roasted Potatoes. I have made this recipe several times, and they are delicious every single time. I've used fresh herbs and dried herbs; I've used russet and fingerlings and small golden butter potatoes and more. This recipe is delicious no matter how you decide to try it. I often fix these with my Chicken Piccata, and they accompany it well. The recipe is rather simple, but it does take a bit of time to roast the potatoes correctly, so plan accordingly.

6- 8 large sized russet potatoes, peeled (if desired) and cut into 1½ to 2 inch chunks
juice of one lemon
¼ to ⅓ cup olive oil (butter or other oil will work as well; a butter/olive oil combination is very good too)
½ tsp kosher salt
½ tsp cracked black pepper

1/2-1 tsp garlic powder
1½ Tbsp dried herbs, oregano, thyme and rosemary are good choices


Preheat oven to 375 degrees, and while it is heating up, place the roasting pan in the oven to heat up. Allowing the pan to get hot will help keep the potatoes from sticking when you put them in the oven. 

Peel (if desired) and cut potatoes. Boil them for only four minutes.


Drain the potatoes.


Add lemon juice and toss potatoes until they absorb it all.


Add oil and herbs and toss potatoes.


Once pan is hot, pull it from the oven and pour the potatoes in the pan.


Roast potatoes for 60-75 minutes, stirring and turning potatoes every 15 minutes or so, until potatoes are tender with crispy edges. Pair with your favorite meal and enjoy!


Wednesday, May 14, 2014

Brussels Sprout Gratin


I wish I could tell you that my daughter absolutely loved this recipe, but actually she didn't. My daughter would much prefer to have just a plain Brussels sprout pile on her plate. Which I like as well, but I'm always on the lookout for a new way to fix a vegetable I like. And even though she did not like this one, I, on the other hand, liked it very much. I think if I make it again I will add a little bit more cream mixture and cheese, but the flavor of this Guy Fieri recipe is fantastic. You can find the original recipe for Brussels Sprout Gratin on the Food Network website. This was the first time I've tried panko breadcrumbs, and WOW! You will be amazed and the flavor and crunch they have. Really good!

1 lb brussels sprouts, cleaned and trimmed
3/4 cups grated sharp Cheddar
1 Tbsp all-purpose flour
1 tsp picked fresh thyme leaves
1 clove garlic, peeled and minced
Kosher salt and freshly cracked black pepper
1 cup heavy cream
1/2 cup panko breadcrumbs
1/4 cup grated Parmesan
1 to 2 Tbsp extra-virgin olive oil
1 Tbsp chopped fresh flat-leaf parsley


Preheat the oven to 350 degrees F.

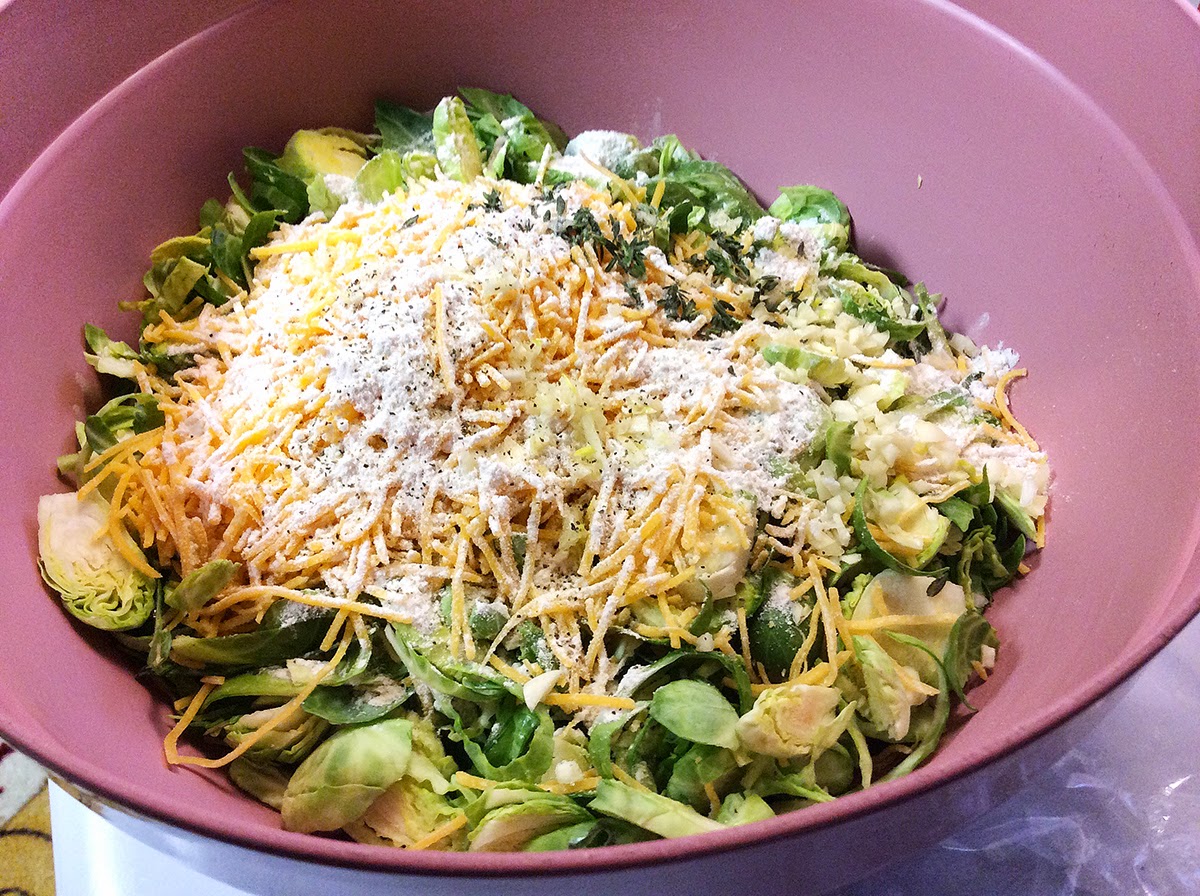
Shave the brussels sprouts horizontally into 1/8-inch slices with a sharp knife or mandoline. Add to a bowl. Add the Cheddar, flour, thyme, garlic and some salt and pepper to the bowl. Toss to combine.

 
Add the mixture to an 8- by 8-inch baking dish, packing it in. Pour over the heavy cream.


In a small bowl, combine the panko, Parmesan and oil and pour over the Brussels sprout mixture.


Bake uncovered until the Brussels sprout are tender, the sauce is bubbling and the top is golden, 25 to 30 minutes. Garnish with the parsley and serve.


Saturday, November 30, 2013

Pumpkin Seeds


Several years back, I decided to roast the pumpkin seeds that we scooped out of the pumpkins we had bought in October. I was amazed at how awesome they were. There's not much to it. All you need is the pumpkin seeds, olive oil, salt, and aluminum foil. So, I'll do this post just a little differently, and just show the photos and tell you some tips that I do in preparing mine.


Start by scooping the innards together and loosening the seeds up. Carefully separate the seeds from the pumpkin.


I do a heavy wash on my seeds. I put them in a colander and rest that on a larger bowl. Fill it up and let them rest in the water occasionally agitating the seeds. Dump the water and do it again. This will help separate the pumpkin guts that are stuck to the seeds. I usually do this at least overnight. When I'm in a hurry, I will still do this at least three times.


Layer the seeds in a shallow pan. Normally I use a 9X13, but this year I had more seeds and ended up using and 11X17 (I think it is anyway). Just make sure you have enough side so that when you stir the seeds you're not knocking them out of the pan. Lightly drizzle them with oil and sprinkle with salt. Stir them to make sure they are all evenly coated. I bake mine at 300 degrees F, stirring every 10 minutes or so. I scrape the the edge in when stirring to make sure they cook evenly. And I taste test them for doneness. They need to have a little crack to them when tasted. 

I've had a lot of compliments on these, and my daughter and I both love them. If you try them, please let me know how you like them!


Sunday, November 24, 2013

Focaccia


Mmmmmmmm bread... I couldn't imagine life without bread. But crazy enough, I really don't eat a lot of sandwiches. I like rolls and side breads rather than sandwiches. Enter focaccia. Made this lovely recipe with dinner the other night. OMG it was so good. I think I could have just eaten the bread and nothing else. I found this recipe on Pinterest: One Hour Skillet Focaccia. This recipe is quick and quite easy. If you are interested in trying your hand at some homemade bread, then this is a recipe you should try.


Bread
3/4 cup warm water
1/2 tsp granulated sugar
1 1/2 tsp yeast
2 Tbsp olive or canola oil
2 cups all-purpose flour
1/2 tsp salt

Topping
4 Tbsp butter, melted (3 Tbsp)
1.5 Tbsp parmesan (1 Tbsp)

1 tsp Italian seasoning (1/2 tsp)

Place water, sugar and yeast in bowl. Allow to rest until yeast proofs. This usually takes 5-10 minutes.


Add 1 cup of flour and salt and mix well.


Add oil (I use olive oil) and remaining flour slowly until dough pulls away from the side of the bowl.


Heat oven to 220 degrees. When warmed up, turn it off and leave door closed.

Turn dough onto floured surface and turn several times until dough is smooth and not sticky anymore. Roll out dough to the size of your skillet.


Grease skillet, and place dough in it and stretch dough up the side.


Cover skillet with towel and place in warmed over for 20 minutes.


Remove skillet from the oven. Turn oven on to 400 degrees. Make indentions in dough using finger. Prepare topping while oven heats up. Melt butter in microwave in 10 or 15 second increments until melted. Let cool just a little and then add parmesan and seasoning. If you add the parmesan too quickly, it will melt and clump. I like my food a little bolder and a little spicier, so I increased the topping mixture. The number in parentheses above indicates original recipe amounts. Brush topping onto dough. If you want, you can also save some for when the bread comes out.


Bake for 20 minutes or until golden brown. With my crazy oven, I think it only took about 15 minutes. Serve, and trust me... ENJOY!!!!


Sunday, March 31, 2013

Rosemary Olive Oil Bread


I think I've mentioned that I love bread. I could subsist on a bread-only diet if it came down to it, and I love all kinds of bread. Buttered, toasted, garlic, rolls, dipped in marinara, and many many more ways. So, I've started making homemade bread, because, well, it's bread. It's warm and homey, and makes the kitchen smell amazing. I found this recipe for Rosemary Olive Oil Bread while searching for bread recipes to try. I've made this loaf of bread several times, and I'm finally getting comfortable with it. Absolutely amazing flavor. It doesn't make a huge loaf, which is nice for a small family.

1 cup warm water (100-110 F)
1 Tbsp sugar
2 tsp active dry yeast
1 tsp salt
2 Tbsp fresh rosemary, chopped (or 2 tsp dried)
1/4 tsp Italian seasoning (
I used about 1/2 tsp -or pinch of each ground garlic, dried oregano, and dried basil)
1/4 tsp freshly ground black pepper
2 Tbsp extra virgin olive oil
1 1/2 cups white whole wheat flour
1/2 cup bread flour + extra for kneading
1 egg, whisked + 1 Tbsp water, for egg wash dried rosemary, for sprinkling


In a large bowl, combine the warm water, sugar, and yeast. Let sit 10 minutes to proof.


Stir in the salt, rosemary, seasonings, olive oil, and whole wheat flour. Add the bread flour and stir until the dough forms a ball. Knead on a lightly floured surface for about 5 minutes, adding more flour as necessary to prevent sticking, until smooth.


Place the dough in a lightly greased bowl; cover and let rise until double in size, about one hour.


Punch down the dough and form it into a round loaf. Place it on a cornmeal dusted parchment paper; cover and let rise until doubled in size, about 45 minutes.


Meanwhile, preheat oven (and pizza stone) to 400 degrees. Once the dough has risen, gently brush the top with egg wash and sprinkle with dried rosemary.


Bake on preheated stone for 20-25 minutes until the top is golden brown and sounds hollow when tapped.