Sunday, September 21, 2014

Lemon Chia Cake


This is a little bit of a different direction for me. Recently, while picking up some between grocery trip items, I saw a container of chia seeds. They sort of looked like poppy seeds, so I did a quick search on my smartphone and learned that these little black and white seeds pack quite a punch and are considered a super food. Just 1 ounce (about 2 tablespoons) contains 139 calories, 4 grams of protein, 9 grams of fat, 12 grams of carbohydrates and 11 grams of fiber, plus vitamins and minerals. Lately, they are also all the rage. 

I added some to my blueberry muffins last weekend. I've also used them in some energy bars recipe I'm trying to develop. So, today as I was searching for something to make with fresh lemon or lime juice, I stumbled upon this Lemon Chia Breakfast Cake on Pinterest. Seemed worth a try. You know what? It was definitely worth it! Very fresh and light and quite yummy. 


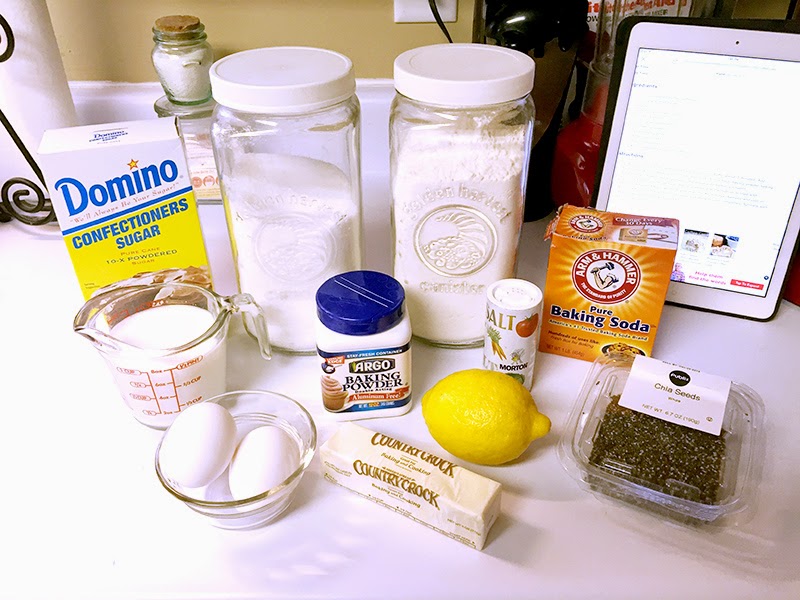
1/2 cup unsalted butter, softened
1 cup granulated sugar
2 eggs
1 lemon, zested and juiced
3/4 cup buttermilk

2 Tbsp chia seeds
1 1/2 cup all purpose flour
1 tsp baking powder
1/2 tsp baking soda
1/4 tsp kosher salt

1/4 cup powdered sugar, for garnish

In a large mixing bowl, beat butter and sugar until fluffy, about 3 minutes.


Add eggs one at a time.

Beat in lemon zest and juice.

Stir in flour, baking powder baking soda and salt. Beat in the buttermilk and chia seeds until batter is smooth.


Pour into a 9-inch round cake pan that is greased and the bottom is lined with parchment paper. 


Bake in a 350 degree oven for 40 minutes. Remove and cool on wire rack for 15 minutes.


Turn onto plate and allow to cool completely. Sprinkle with powdered sugar before serving.


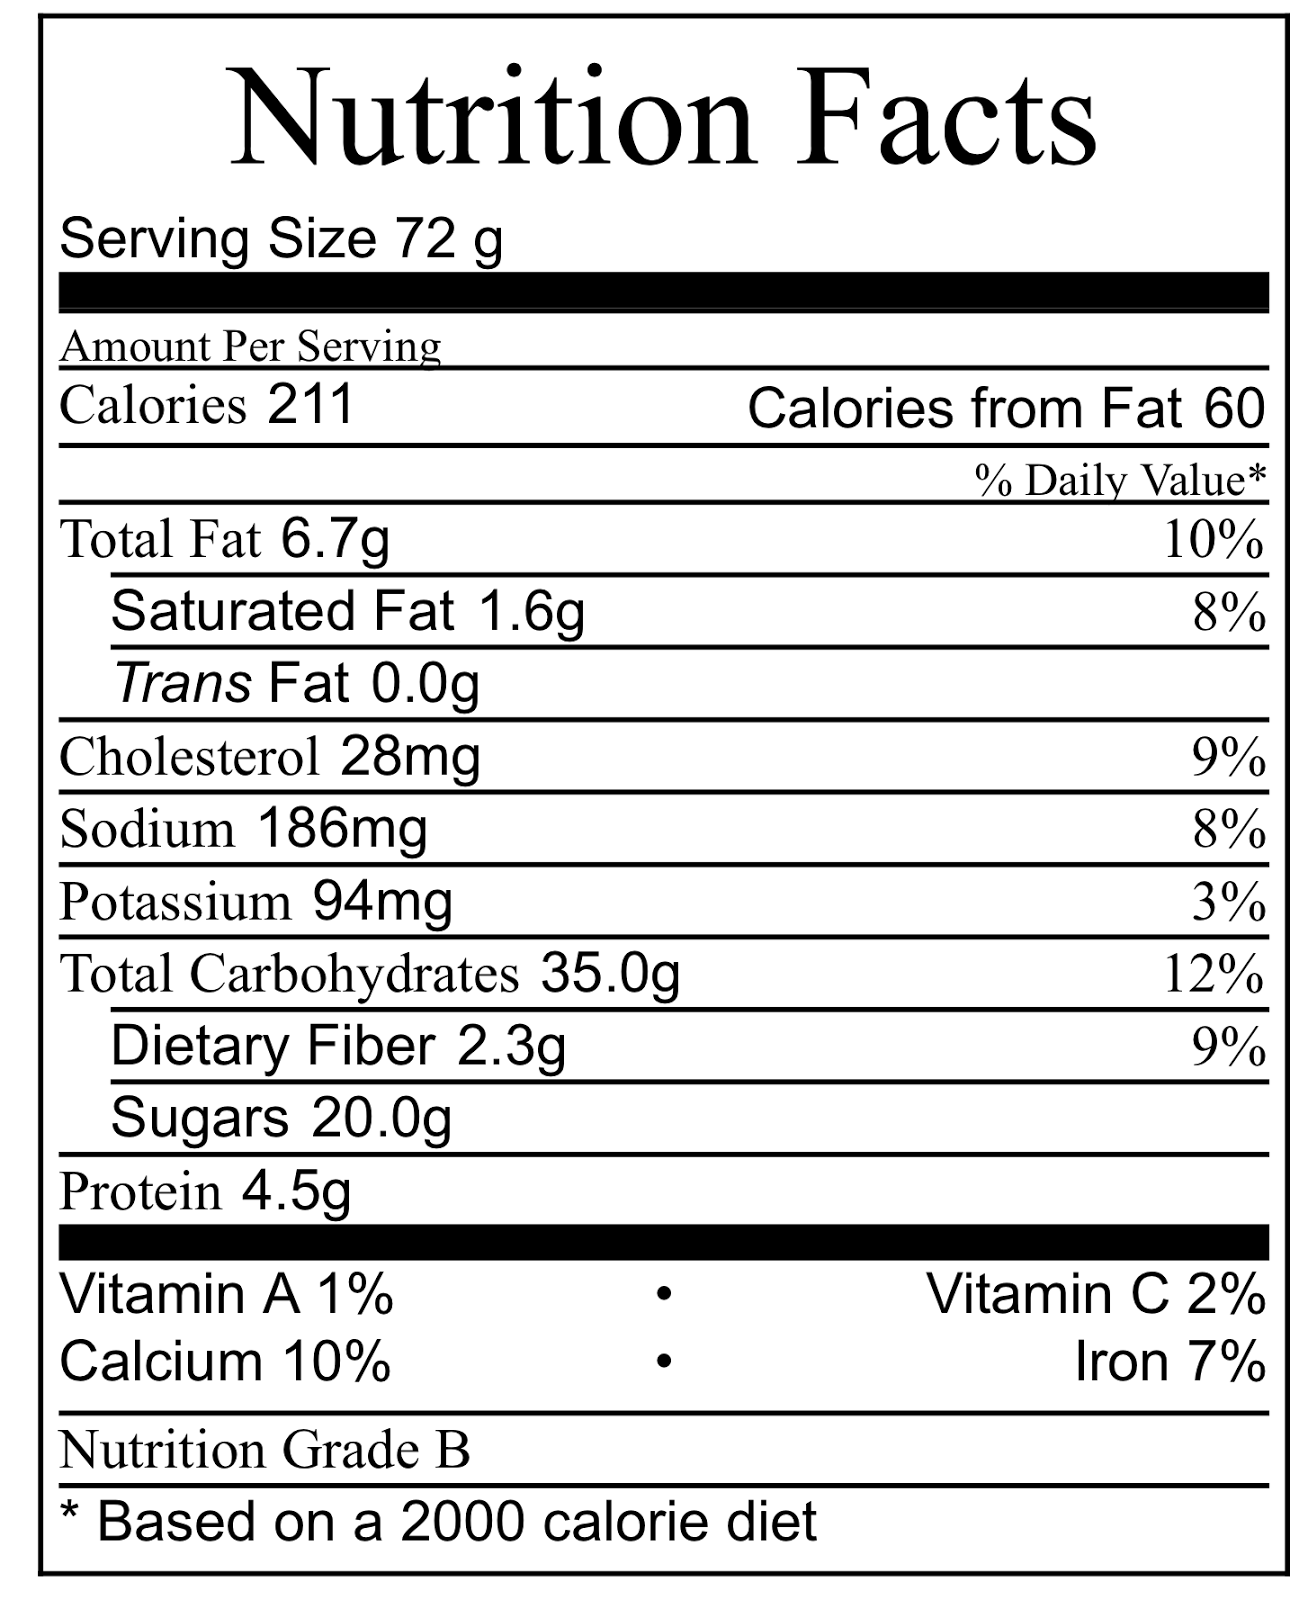
Nutritional information (12 servings)


Thursday, September 4, 2014

Chicken al-a-good


A long, long time ago in a land far, far... oops! This isn't a fairy tale; this is the real deal. My mom got this recipe from her cousin (who is sort of like an aunt to me) quite a few years ago, and it just hits the spot! It's not difficult to make... at least my adaptation isn't. The original recipe was a bit time consuming, but I've adjusted. Also, the original recipe (see right) makes a 9x13 casserole. Having a fairly small family, that is just too much food, so what I'm going to give you are the ingredients necessary for an 8x8 casserole. This comfortably feeds two with leftovers.

2 lbs boneless chicken
1 can cream of chicken soup
4 oz (1/2 cup) sour cream
1 pack of saltine crackers
1 stick butter


Begin by boiling the chicken until cooked through. Remove from stove and allow to cool until you can comfortably handle it. Dice the chicken into bite size pieces.


In a bowl, mix the sour cream and cream of chicken until combined and smooth.


Layer this mixture over the diced chicken.


In another bowl, melt the butter. I use a metal bowl and melt it on the stove as I'm working on the other parts. You could melt it in the microwave in a microwave safe bowl if you prefer. Before opening the bag of crackers, shift them all to one end, lay the first few flat and begin to crush the crackers working all the way through the bag. Once all the crackers are crushed, add them to the butter, and using a fork, mix the crackers until each one is coated and all the butter is absorbed.


Layer the cracker mixture on top of the casserole.


Bake at 350 degrees about 35-45 minutes, or until crackers are golden brown and the soup mixture is bubbling at the edges.


Sunday, August 3, 2014

Bean and Cheese Burritos


If you have followed many of my blogs, you have probably noticed that there are quite a few recipes with a Mexican flair. I can't help it. My dad was from Texas, and he made sure I grew up on Old El Paso and Tex Mex-style food. Now that I'm older, I'm learning how to make many of those dishes from scratch, and there have been quite a few successes! This recipe here for bean and cheese burritos is one of the successes. I use the base recipe I received from my aunt for bean dip (I just don't add the sour cream). Then I followed this blog for Freezer Burritos for how to package and freeze the burritos I made. This recipe makes 10 burritos, and two are a very filling meal when eaten by themselves.

2 27-ounce cans of chili beans
1 small onion
2-4 cloves of garlic
variety of peppers for the amount of heat you want (you can use more peppers for flavor but reduce their heat some by scraping out many of the seeds)
1 Tbsp cumin


Dice the peppers and garlic.


Place beans in a pot large enough to hold them and allow you room to stir. Add onion, peppers, garlic and cumin.


Bring to a boil; reduce heat and simmer for several hours stirring frequently until mixture thickens and the beans are soft and mushy. Use a spoon or a masher to mash beans together.


Then assemble your ingredients for the burritos - cheese, refried beans, tortillas and aluminum foil.


Warm tortillas for 30 seconds in the microwave. Take a tortilla, place on aluminum foil and scoop one to two spoonfuls of beans. Sprinkle with cheese.


Fold sides in, then begin rolling from the short side, ensuring that the seam ends up on the bottom.


Wrap burrito in aluminum foil, and then place in a freezer-safe bag.


If you want to cook some at this point, bake unwrapped burritos in 400 degree Fahrenheit oven for 7-10 minutes until burrito shell begins to turn golden brown. Ensure the seam side is down. If not, freeze burritos, and when ready to cook, place frozen burritos in 400 degree Fahrenheit oven and bake for 35 minutes. Remove aluminum foil and bake for 7 minutes longer until burrito begins to turn golden brown.